Firebase Push Notifications in .NET MAUI (Android)

In this post, you’ll learn how to implement push notifications in your .NET MAUI Android application using Firebase.
Let’s get started.
Install NuGet package
Create a .NET MAUI project in Visual Studio and install the NuGet package Plugin.Firebase.

If you encounter an error installing via the NuGet Package Manager, try installing the package via the dotnet CLI instead.
Go to View, then Terminal or press Ctrl + `. Switch to the root project directory, then:
dotnet add package Plugin.FirebaseOnce done, install NuGet package Plugin.Firebase.Crashlytics.

Unsupported TargetFrameworks
The plugin does not support Mac Catalyst or Windows, so you have to remove these target frameworks from your .csproj file:

or use preprocessor directives and MSBuild conditions, e.g:
<ItemGroup Condition="'$(TargetFramework)' == 'net6.0-ios' OR '$(TargetFramework)' == 'net6.0-android'">
    <PackageReference Include="Plugin.Firebase" Version="2.0.3" />
    <PackageReference Include="Plugin.Firebase.Crashlytics" Version="2.0.1" />
</ItemGroup>
Also, remove them from the SupportedOSPlatformVersion and TargetPlatformMinVersion:

Your .csproj PropertyGroup should look like this:
<PropertyGroup>
    <TargetFrameworks>net6.0-android;net6.0-ios;</TargetFrameworks>
    <!-- Uncomment to also build the tizen app. You will need to install tizen by following this: https://github.com/Samsung/Tizen.NET -->
    <!-- <TargetFrameworks>$(TargetFrameworks);net6.0-tizen</TargetFrameworks> -->
    <OutputType>Exe</OutputType>
    <RootNamespace>MauiFirebaseDemo</RootNamespace>
    <UseMaui>true</UseMaui>
    <SingleProject>true</SingleProject>
    <ImplicitUsings>enable</ImplicitUsings>

    <!-- Display name -->
    <ApplicationTitle>MauiFirebaseDemo</ApplicationTitle>

    <!-- App Identifier -->
    <ApplicationId>com.cedricgabrang.mauifirebasedemo</ApplicationId>
    <ApplicationIdGuid>E47110BD-FD93-4DE6-9E1E-797853D5B406</ApplicationIdGuid>

    <!-- Versions -->
    <ApplicationDisplayVersion>1.0</ApplicationDisplayVersion>
    <ApplicationVersion>1</ApplicationVersion>

    <SupportedOSPlatformVersion Condition="$([MSBuild]::GetTargetPlatformIdentifier('$(TargetFramework)')) == 'ios'">14.2</SupportedOSPlatformVersion>
    <SupportedOSPlatformVersion Condition="$([MSBuild]::GetTargetPlatformIdentifier('$(TargetFramework)')) == 'android'">21.0</SupportedOSPlatformVersion>
    <SupportedOSPlatformVersion Condition="$([MSBuild]::GetTargetPlatformIdentifier('$(TargetFramework)')) == 'tizen'">6.5</SupportedOSPlatformVersion>
</PropertyGroup>
Setup in Firebase Console
Create a project in the Firebase Console.
Once you’re done creating a project, you’ll be redirected to the Project Overview page.
Click Android to start adding Firebase to your app and follow the setup steps.

IMPORTANT: Make sure to enter the package name (ApplicationId in your .csproj file) that your .NET MAUI project is using.
Firebase configuration file
Add the google-services.json file to the root folder of your project and set the Build Action to GoogleServicesJson.
Include it in your .csproj file like this:
<ItemGroup Condition="'$(TargetFramework)' == 'net6.0-android'">
    <GoogleServicesJson Include="google-services.json" />
</ItemGroup>
Firebase Initialization
Put the initialization call in your MauiProgram.cs like this:
using Microsoft.Maui.LifecycleEvents;
using Plugin.Firebase.Auth;
using Plugin.Firebase.Bundled.Shared;
#if IOS
using Plugin.Firebase.Bundled.Platforms.iOS;
#else
using Plugin.Firebase.Bundled.Platforms.Android;
#endif

namespace MauiFirebaseDemo;

public static class MauiProgram
{
    public static MauiApp CreateMauiApp()
    {
        var builder = MauiApp.CreateBuilder();
        builder
            .UseMauiApp<App>()
            .RegisterFirebaseServices()
            .ConfigureFonts(fonts =>
            {
                fonts.AddFont("OpenSans-Regular.ttf", "OpenSansRegular");
                fonts.AddFont("OpenSans-Semibold.ttf", "OpenSansSemibold");
            });

        return builder.Build();
    }

    private static MauiAppBuilder RegisterFirebaseServices(this MauiAppBuilder builder)
    {
        builder.ConfigureLifecycleEvents(events => {
#if IOS
            events.AddiOS(iOS => iOS.FinishedLaunching((app, launchOptions) => {
                CrossFirebase.Initialize(CreateCrossFirebaseSettings());
                return false;
            }));
#else
            events.AddAndroid(android => android.OnCreate((activity, _) =>
                CrossFirebase.Initialize(activity, CreateCrossFirebaseSettings())));
#endif
        });

        builder.Services.AddSingleton(_ => CrossFirebaseAuth.Current);
        return builder;
    }

    private static CrossFirebaseSettings CreateCrossFirebaseSettings()
    {
        return new CrossFirebaseSettings(isAuthEnabled: true,);
    }
}
Enable Cloud Messaging
To receive push notifications, set isCloudMessagingEnabled to true:
private static CrossFirebaseSettings CreateCrossFirebaseSettings()
{
    return new CrossFirebaseSettings(
        isAuthEnabled: true,
        isCloudMessagingEnabled: true);
}
Crashlytics
Add the following line of code after calling CrossFirebase.Initialize():
CrossFirebaseCrashlytics.Current.SetCrashlyticsCollectionEnabled(true);Then, set isAnalyticsEnabled to true:
private static CrossFirebaseSettings CreateCrossFirebaseSettings()
{
    return new CrossFirebaseSettings(
        isAuthEnabled: true,
        isCloudMessagingEnabled: true,
        isAnalyticsEnabled: true);
}
Android Specifics
At Platforms/Android/Resources/values add the following line to your strings.xml:
<?xml version="1.0" encoding="utf-8" ?>
<resources>
    <string name="com.google.firebase.crashlytics.mapping_file_id">none</string>
</resources>
Add the following ItemGroup to your .csproj file to prevent build errors:
<ItemGroup Condition="'$(TargetFramework)' == 'net6.0-android'">
    <PackageReference Include="Xamarin.Kotlin.StdLib.Jdk7" Version="1.7.10" ExcludeAssets="build;buildTransitive" />
    <PackageReference Include="Xamarin.Kotlin.StdLib.Jdk8" Version="1.7.10" ExcludeAssets="build;buildTransitive" />
</ItemGroup>
Android Setup
In your AndroidManifest.xml. Add the following code snippet to the <application> tag :
<receiver
    android:name="com.google.firebase.iid.FirebaseInstanceIdInternalReceiver"
    android:exported="false" />
    <receiver
        android:name="com.google.firebase.iid.FirebaseInstanceIdReceiver"
        android:exported="true"
        android:permission="com.google.android.c2dm.permission.SEND">
    <intent-filter>
        <action android:name="com.google.android.c2dm.intent.RECEIVE" />
        <action android:name="com.google.android.c2dm.intent.REGISTRATION" />
        <category android:name="${applicationId}" />
    </intent-filter>
</receiver>
Call FirebaseCloudMessagingImplementation.OnNewIntent(intent) from MainActivity.OnCreate(...) and MainActivity.OnNewIntent(...). Then create a notification channel and set the ChannelId to FirebaseCloudMessagingImplementation.
Here’s a reference for how your MainActivity.cs should look like:
using Android.App;
using Android.Content;
using Android.Content.PM;
using Android.OS;
using Plugin.Firebase.CloudMessaging;

namespace MauiFirebaseDemo;

[Activity(Theme = "@style/Maui.SplashTheme", MainLauncher = true, ConfigurationChanges = ConfigChanges.ScreenSize | ConfigChanges.Orientation | ConfigChanges.UiMode | ConfigChanges.ScreenLayout | ConfigChanges.SmallestScreenSize | ConfigChanges.Density)]
public class MainActivity : MauiAppCompatActivity
{
    protected override void OnCreate(Bundle savedInstanceState)
    {
        base.OnCreate(savedInstanceState);
        HandleIntent(Intent);
        CreateNotificationChannelIfNeeded();
    }

    protected override void OnNewIntent(Intent intent)
    {
        base.OnNewIntent(intent);
        HandleIntent(intent);
    }

    private static void HandleIntent(Intent intent)
    {
        FirebaseCloudMessagingImplementation.OnNewIntent(intent);
    }

    private void CreateNotificationChannelIfNeeded()
    {
        if (Build.VERSION.SdkInt >= BuildVersionCodes.O)
        {
            CreateNotificationChannel();
        }
    }

    private void CreateNotificationChannel()
    {
        var channelId = $"{PackageName}.general";
        var notificationManager = (NotificationManager)GetSystemService(NotificationService);
        var channel = new NotificationChannel(channelId, "General", NotificationImportance.Default);
        notificationManager.CreateNotificationChannel(channel);
        FirebaseCloudMessagingImplementation.ChannelId = channelId;
        //FirebaseCloudMessagingImplementation.SmallIconRef = Resource.Drawable.ic_push_small;
    }
}
Retrieve FCM Token
This token is the identifier that Firebase uses to determine which device it should send push notifications to.
In your MainPage.xaml.cs, modify the event handler OnCounterClicked:
private async void OnCounterClicked(object sender, EventArgs e)
{
    await CrossFirebaseCloudMessaging.Current.CheckIfValidAsync();
    var token = await CrossFirebaseCloudMessaging.Current.GetTokenAsync();
    Console.WriteLine($"FCM token: {token}");
}
Now, run your app on a physical device. Click the button to retrieve the token for your device. Go to the Output window and copy the token or set a breakpoint in your code and copy the value.
Let’s try it out!
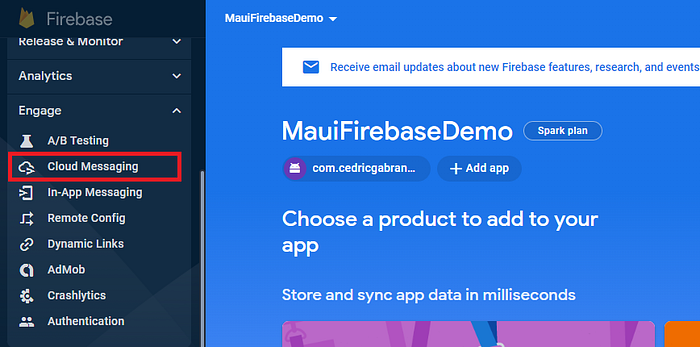
Go to the Firebase Console. Navigate to the Cloud Messaging under the Engage menu.
Click Send your first message and enter your Notification title and Notification text. Then click Send test message.
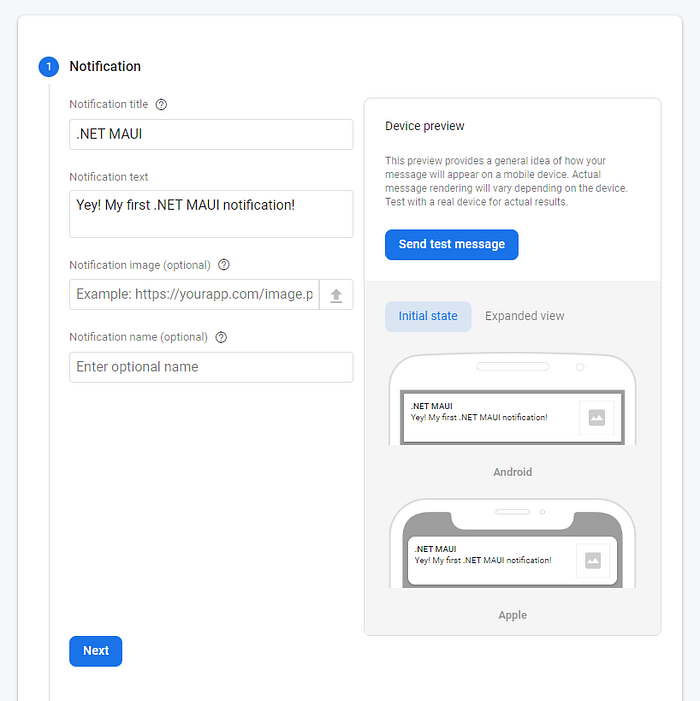
Now, you’ll be prompted to enter an FCM registration token. Paste the token you just copied earlier from your Visual Studio.
Here’s a quick demo of how it works:
Closing thoughts
This article covers the basic setup of push notifications with Firebase on Android.
There are different ways and best practices for managing registration tokens. Check out the thorough documentation of Best Practices for FCM Registration Token Management.
You can also check out the source code example on my GitHub.
Your support would greatly help me continue my journey of creating quality content and contributing to the software development community. Thank you for considering!